
Art and Science of LIFETILES
 The notion of making “movies for the
wall” came to me when a colleague of mine, animator Flip Johnson,
built a large-scale experimental zoetrope in my Boston Loft in the mid
1980s. On the wall, he'd drawn a ten-foot long series of fish in
different phases of motion, lit them with fluorescent lights, then,
about a foot in front of the wall he positioned a ten-foot long big
strip of black cardboard with a series of vertical slits cut in it. If
you ran alongside the wall with your head turned at a neck-cramping 90
degree angle you got the impression of movement, although perhaps a
bit dark and blurry. Flip seemed disappointed by the result of his
efforts, but I thought it was great.
The notion of making “movies for the
wall” came to me when a colleague of mine, animator Flip Johnson,
built a large-scale experimental zoetrope in my Boston Loft in the mid
1980s. On the wall, he'd drawn a ten-foot long series of fish in
different phases of motion, lit them with fluorescent lights, then,
about a foot in front of the wall he positioned a ten-foot long big
strip of black cardboard with a series of vertical slits cut in it. If
you ran alongside the wall with your head turned at a neck-cramping 90
degree angle you got the impression of movement, although perhaps a
bit dark and blurry. Flip seemed disappointed by the result of his
efforts, but I thought it was great.
Up until then I'd been an independent filmmaker and film teacher at the Boston School of the Museum of Fine Arts. I'd always been a fan of classic motion picture toys and techniques, and routinely employed classic tricks of the trade in my films. So it naturally occurred to me that there might be a way to successfully accomplish what Flip was trying to do, but by using lenses instead of slits.
I started experimenting by pasting a dozen successive flip book drawings on the wall and positioning a dozen dime-store magnifying glasses in front of them. When I walked by, the images popped, but they didn't animate.
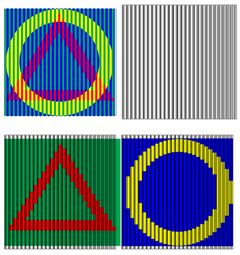 Then I thought if I could only get one image to
change to another, I'd be on my way. So I went to the local plastics
store and bought a bunch of one-quarter inch-thick clear plastic rods.
I glued them together side-by-side to create a lenticular sheet. Then
I did a drawing on a piece of paper. First I drew a series of
side-by-side thin lines, each one-eighth of an inch from the other. I
lightly drew a triangle over the whole paper, then filled in the
triangular shape on every other eighth-inch space. I then drew a different
colored circle in all the intermediate spaces. Seen from a distance,
the drawing of staggered stripes looked like a circle superimposed
over a triangle. But when I put my homemade lenticular sheet over it,
an amazing transformation took place ("lenticular" because the rods
act like vertical lenses - by the way, did you know the word "lens"
comes from "lentil?" Think about it!).
Then I thought if I could only get one image to
change to another, I'd be on my way. So I went to the local plastics
store and bought a bunch of one-quarter inch-thick clear plastic rods.
I glued them together side-by-side to create a lenticular sheet. Then
I did a drawing on a piece of paper. First I drew a series of
side-by-side thin lines, each one-eighth of an inch from the other. I
lightly drew a triangle over the whole paper, then filled in the
triangular shape on every other eighth-inch space. I then drew a different
colored circle in all the intermediate spaces. Seen from a distance,
the drawing of staggered stripes looked like a circle superimposed
over a triangle. But when I put my homemade lenticular sheet over it,
an amazing transformation took place ("lenticular" because the rods
act like vertical lenses - by the way, did you know the word "lens"
comes from "lentil?" Think about it!).
When I stood to the left and viewed the assembly, all the eighth-inch stripes with pieces of the triangle lined up with and were optically expanded horizontally by the clear plastic rods, creating the illusion of a solid (if a bit "pixellated") triangle. When I stepped to the right, the triangle dissolved away, becoming a circle.
Enthused, I stuck a series of evenly-spaced vertical black tape stripes on a giant sheet of glass. I built a free-standing frame for the glass which permitted the glass to slide left and right if I pushed it. I then took double exposures in my Rolleiflex of friends through the striped glass. In the first exposure, for instance, they would have their hands in their laps. Then, I'd slide the glass over a fraction of an inch, so that where the black stripes had been was now clear, and what had been clear was now black. Then, I'd have my subject raise his or her hands and smile, and take the second exposure. I then printed the resulting photo the correct size to line it up behind my homemade lenticular sheets ( by now I was experimenting with all sizes of rods and using clear polyester resin to stick them together). When you walked by, the person in the image would appear to raise his or her hands and smile. These two phases would repeat, or "cycle", about three times before the viewing angle made the image blurry—cycling is an important part of the medium, as I'll explain later.
I experimented with multiple exposures using this kind of "picket fence" of black tape stripes in different configurations (i.e., closer together), and was able to do up to three phases of movement clearly with my rod-based lenticular sheets. Beyond three phases, the images mixed together.
About this time, Flip returned from his patent investigations in Arlington, VA, looking more disappointed than ever. First of all, he’d found that something like his flat-wall zoetrope idea had already been patented in both Europe and the U.S. In fact, one had already been installed in the Brooklyn subway system. He also had come across a number of lenticular patents. Some of them dated back as far as 1910 or so, some of them depicted changing billboard-type signs. "There is nothing new under the sun," Flip said.
My study of these lenticular patents revealed that, in conventional lenticular technology (like those little Crackerjacks "wiggle pictures"—called Vari Vues ), instead of complete round rods clustered together, only the topmost section of each rod's optical arc was used. In effect, the lenticular surface was a cluster of partial arcs. By a wonderful stroke of luck, a stained glass artist who knew of my experiments gave me an old one-by-two-foot sample of 1930's glass—called Band-Lite—which had a similar lensed configuration. I experimented with it.
The Band-Lite glass, only a quarter inch thick and flat on the back, had one inch wide vertical ribs on the surface with shallow arcs. By shining a light through the glass from the opposite side of the room, I found I could project a series of very sharp bright lines on a piece of paper about four inches away (the "focal length" of these cylindrical lenses). Each strip of focused light was about 1/5th of an inch wide. This meant that I could now produce animated photographs with five phases of movement.
I cast a mold from the Band-Lite glass sample,
manufactured a dozen or so clear plastic replicas, and suspended
them with fishing line from the ceiling four inches from the wall. I
then created a number of 5 phase animated photos using my picket
fence
glass-sheet multiple exposure technique and mounted them on
the wall behind the hanging lenticular sheets. When I swung the
sheets from side to side and stood back, the images animated nicely:
an eye blinked; hands opened and closed.
Even though the resolution was poor (how much clarity could I expect if each line was one-inch wide and there were only 24 lines across?), I was excited. I advertised in a glass trade journal looking for more Band-Lite glass, hoping to get my hands on a giant sheet that I could use to make a full-sized animated figure. I got a response to my ad from Howard Bowen (MBC Glass, Inc.), a glass artist in Bloomingburg, NY, who thought he could help. As it turned out, Howard was unable to get me access to more Band-Lite glass. But he did get me started in a different, better direction.
He introduced me to Michael Benzer of Hudson Beach Glass (Beacon, NY). Michael casts his own line of beautiful architectural glass tiles. His tiles have ribbed surfaces, although rough-hewn and angular. It occurred to me that, if it were possible to design a lenticular tile of similar dimensions, it could be used as a building block to create animated murals of any size. Furthermore, since I was designing it from the bottom up, I could get better resolution (closely spaced ribs) and a shorter focal length (the thickness of the tile itself).
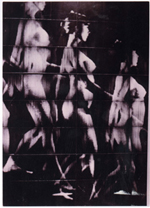 Casting experimental clear plastic lenticular
tiles from a series of aluminum molds (groove-milled to my
specifications at a machine shop), I finally came up with a prototype
with which I produced my first large scale lenticular work, the 4'
wide by 6' high "Nude Descending a Staircase " When you walked by, the
nude actually descended! I moved to a larger loft in Providence, RI,
to expand production—and then a big fire came and wiped out my new
studio along with 12 other Civil-War era factory buildings and 80
other businesses.
Casting experimental clear plastic lenticular
tiles from a series of aluminum molds (groove-milled to my
specifications at a machine shop), I finally came up with a prototype
with which I produced my first large scale lenticular work, the 4'
wide by 6' high "Nude Descending a Staircase " When you walked by, the
nude actually descended! I moved to a larger loft in Providence, RI,
to expand production—and then a big fire came and wiped out my new
studio along with 12 other Civil-War era factory buildings and 80
other businesses.
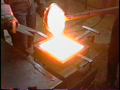 Since all my molds were lost in the fire (along with the
Nude and all my original negatives), I decided this was the time to
start fresh—in glass. With a Mellon grant obtained through the
Museum School (where I continued to teach film), I contracted Michael
Benzer to mill a steel mold for me and cast the first glass LIFETILE
based on my plastic tile design. Beautiful in appearance, though
rough-hewn and filled with tiny bubbles and swirls, the glass LIFETILE
was capable of supporting up to six different phases of movement.
Since all my molds were lost in the fire (along with the
Nude and all my original negatives), I decided this was the time to
start fresh—in glass. With a Mellon grant obtained through the
Museum School (where I continued to teach film), I contracted Michael
Benzer to mill a steel mold for me and cast the first glass LIFETILE
based on my plastic tile design. Beautiful in appearance, though
rough-hewn and filled with tiny bubbles and swirls, the glass LIFETILE
was capable of supporting up to six different phases of movement.
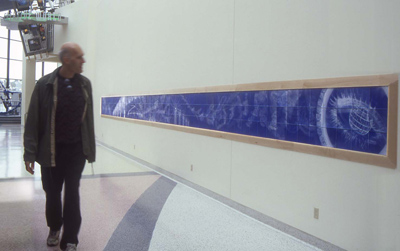
By now I was figuring out better ways to created the striped, or "coded" image. Instead of positioning live subjects behind the striped glass, I made a series of mural prints from motion picture stills and re-photograph them as multiple exposures through striped glass sheets. I learned to break each of these images into tiny squares, which, when blown up, would each fit a separate LIFETILE. Leaving the striped glass technique behind, I got an Amiga computer to scan in the images instead and broke them into stripes and created the coded images in the computer. I took the coded image printouts, re-photographed them and created exact-size prints to glue onto the back of the glass tiles.
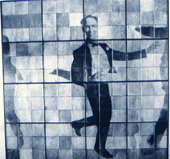 In 1990,
I made my largest LIFETILES work to date at that point: Brian
Jones, Tap Dancer. I first filmed Brian, who is arguably the greatest
tap dancer in New England, in 16mm. Using a home-made cyanotype
process, I created 144 separate coded-image blue photos on archival
drawing paper and aligned and glued them to the back of the glass
tiles. When you walk by, the 8-foot high dancing figure leaps and
spins alongside you. Although this piece has only four phases of
movement, as you walk along, the dancer goes through more than nine
separate moves, moving from one side of the mural to the other,
never seeming to repeat a move.
In 1990,
I made my largest LIFETILES work to date at that point: Brian
Jones, Tap Dancer. I first filmed Brian, who is arguably the greatest
tap dancer in New England, in 16mm. Using a home-made cyanotype
process, I created 144 separate coded-image blue photos on archival
drawing paper and aligned and glued them to the back of the glass
tiles. When you walk by, the 8-foot high dancing figure leaps and
spins alongside you. Although this piece has only four phases of
movement, as you walk along, the dancer goes through more than nine
separate moves, moving from one side of the mural to the other,
never seeming to repeat a move.
 This "non-repeating" effect is a typical
"zoetropic" or "film looping" technique, which is made possible in
part, as I mentioned, by the fact that the medium will "cycle" the
same set of images about 3 times clearly as the observer walks by.
This means that if you can design the last phase of movement to "link
up" with the first phase of movement, you can create the illusion of
continuous movement. In the case of the Dancing Man, the image in
Phase 1 has the first dancer entering from the left, as well as the
dancer in a different pose, five "moves" away to the right, starting
to exit the frame. The image in phase 2 has the first dancer, now
almost completely entered from the left, as well as the other dancer
in a different pose, far to the right, almost exiting. Phase 3 has
the first dancer, now fully entered from the left, and just a part of
the other dancer (far right), almost completely out of the frame.
Phase 4 has the dancer in the middle of the picture. In other words,
as long as the subject "moves alongside" the viewer, the subject never
has to repeat a movement! Thus, I was now free to design entire
hallway-length animated displays of fish swimming, cats running, etc.
This "non-repeating" effect is a typical
"zoetropic" or "film looping" technique, which is made possible in
part, as I mentioned, by the fact that the medium will "cycle" the
same set of images about 3 times clearly as the observer walks by.
This means that if you can design the last phase of movement to "link
up" with the first phase of movement, you can create the illusion of
continuous movement. In the case of the Dancing Man, the image in
Phase 1 has the first dancer entering from the left, as well as the
dancer in a different pose, five "moves" away to the right, starting
to exit the frame. The image in phase 2 has the first dancer, now
almost completely entered from the left, as well as the other dancer
in a different pose, far to the right, almost exiting. Phase 3 has
the first dancer, now fully entered from the left, and just a part of
the other dancer (far right), almost completely out of the frame.
Phase 4 has the dancer in the middle of the picture. In other words,
as long as the subject "moves alongside" the viewer, the subject never
has to repeat a movement! Thus, I was now free to design entire
hallway-length animated displays of fish swimming, cats running, etc.
 After
seeing my Tap Dancer piece, a Boston exhibit firm contracted me to
create an animated mural of Duke Ellington playing the piano (from
frames of a 1935 movie called "Hit Parade") for a travelling
Smithsonian Institute exhibit, and my LIFETILES career was
started. To keep this particular display light for travel, I made it
from clear plastic LIFETILES with coded-image photos glued to
the back, but I knew if I was going to sell my work architecturally in
glass, I'd have to find a way to make the images more permanent.
After
seeing my Tap Dancer piece, a Boston exhibit firm contracted me to
create an animated mural of Duke Ellington playing the piano (from
frames of a 1935 movie called "Hit Parade") for a travelling
Smithsonian Institute exhibit, and my LIFETILES career was
started. To keep this particular display light for travel, I made it
from clear plastic LIFETILES with coded-image photos glued to
the back, but I knew if I was going to sell my work architecturally in
glass, I'd have to find a way to make the images more permanent.
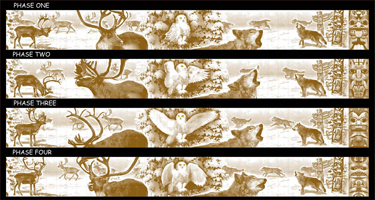
Through Howard Bowen, I learned how to sand-blast photographic images into the backs of my tiles and, at the Museum School's glass department, how to permanently fire glass paint into those blasted areas. I used the down payment from my first major job, a 50 foot-long marine mammal mural for the Baltimore Aquarium, to set up an industrial-strength LIFETILES studio with a kiln and sandblaster. That was a 6 month long, 720-LIFETILE installation which Howard Bowen and his wife Deb installed.
I've recently read that researchers have determined that lenticular images are technically more difficult to create than holographic images, and I believe them. The alignment of the coded images to the clear lenticular tiles is a tricky business. I can only align about 20 tiles a day. It's like putting a gigantic jigsaw puzzle together. Not only does each tile have to animate clearly, it has to work with all the others. The ratio of image size to tile size is critical to the thousandth of an inch, and it varies with the average viewing distance of each installation (each work is site-specific). To align the images, I use a rig that has been described as looking like a gigantic camera: a huge glass table hanging from the ceiling high in the air over a giant mirror. I won't bore you with the specifics, but, bizarre-looking as it is, it works.
I continue to improve and develop new techniques, but it still takes 4 to 5 hours to make one LIFETILE.
Today, at my Boston-based Eye Think, Inc. studio, in addition to producing a line of optically animated gift items, I continue to design and fabricate LIFETILES for public places around the world. We now cast our own LIFETILES in-house using our own electric hot glass furnace. Of course, I couldn't do all this without the assistance of a team of extremely talented professional artists and art students recruited from Boston's higher caliber art schools.
I guess I think of my LIFETILES murals and my smaller optically animated creations as “retro-tech” rather than hi-tech works. After all, these are things that perhaps could have been made 100 years ago.
Maybe, as Flip said, there isn't anything new under the sun. But sometimes—with a little effort and luck—maybe we can make the old seem new.